It’s Sophia Duleep Singh, omg…

I use this as a vegan food blog, but I needed to make an exception for World Book DayWomen’s History Month and International Women’s Day. I want to tell you about an incredible woman I read about who I find endlessly inspiring. I cannot stress her significance enough, but I’ll try my best to keep it brief… 
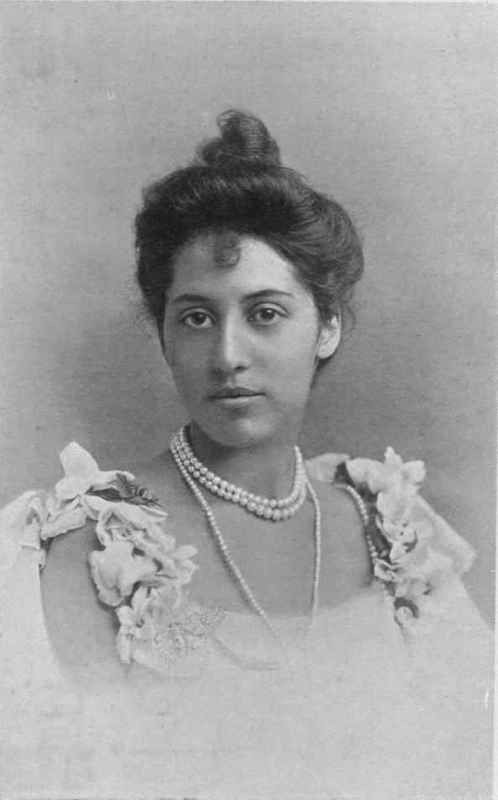
Daughter of the last Maharaja of the Sikh Empire in Punjab and his Christian missionary German/Ethiopian wife, she was an exiled princess who lived quite the aristocratic lifestyle in Britain. Though she experienced upheavals and family deaths in childhood and early adulthood, her godmother Queen Victoria granted her an allowance and a free apartment. She was an It-Girl of her time who enjoyed high fashion, dog breeding, parties and chain smoking expensive cigarettes.

This was until the early 1900s when she left England with her sisters, against orders of the British government. It was then she witnessed the contrast of extreme poverty and wealth of the people living in colonised India. She developed links with Indian Nationalists and returned to Britain with an altered attitude. She realised being a fashionable socialite was empty and unfulfilling, so became involved in radical social change movements, primarily the Suffragettes, using her public status to draw attention.

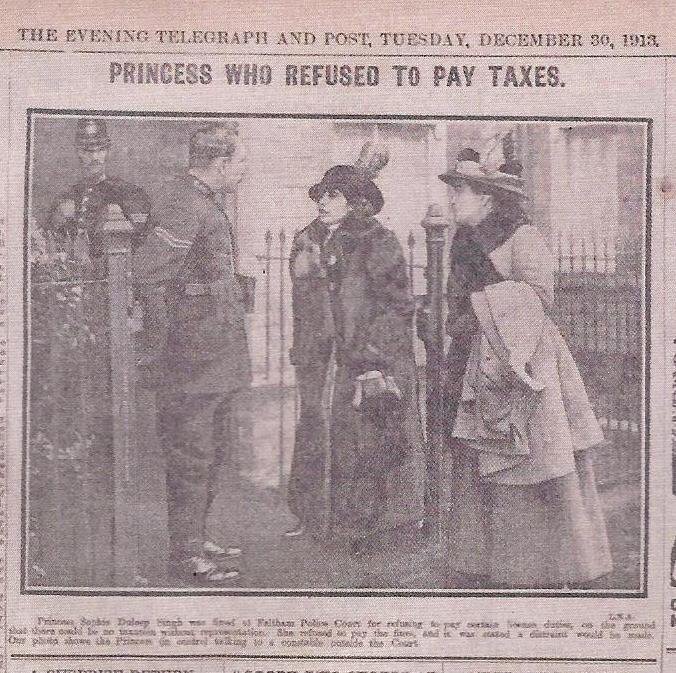
Attending the notorious Black Friday protest in 1910, she stepped in when she saw a woman being brutally attacked by a policeman. She took it upon herself to relentlessly write letters seeking justice for this incident to the Home Office, which eventually even pissed off Winston Churchill who marked the file “send no further reply to her”. She ran out in front of the Prime Minister Herbert Asquith‘s car with a “Give Women the Vote” banner. She consistently refused to pay her taxes, as a member of the Women’s Tax Resistance League, and in court was bold enough to demand recognition as a citizen with a voting right before she would ever pay them. Bailiffs auctioned off her jewellery… which fellow Suffragettes bought and gave back to her.    

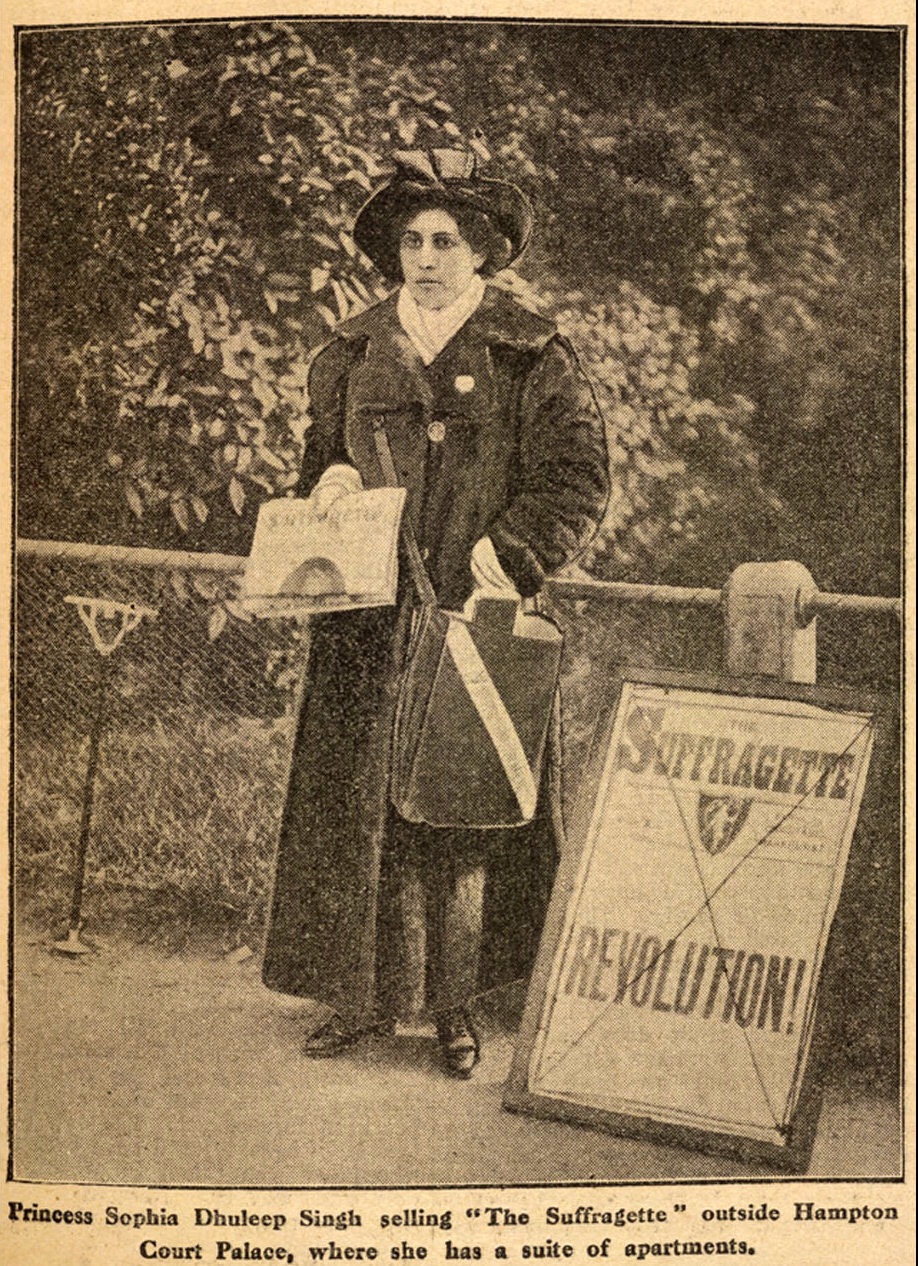
There is so much to say about this defiant and dedicated woman who went on to become the leader of the Suffragette Fellowship after Emmeline Pankhurst’s death, yet she is largely unheard of. Not to mention her work as a nurse during World War I and her role in the independence of India. She devoted her entire life to the advancement of women. A freedom fighting woman of colour in early 1900s Britain… can you even imagine? She lived long enough to see through everything she fought for.

I find it incredulous and hugely sad that I only heard about her six months ago, just after the Suffragette film was released. Although important and long overdue, it does not make any sense to me how a film about inequality could completely exclude non-white women. I was moved to tears many times when reading Anita Anand’s book (links below). Tears of relief for learning of a bad ass European/Indian feminist, tears at the tragedies throughout her life, and tears of frustration that she had been excluded from my history classes and denied a voice. I would absolutely recommend this book, as it goes into fascinating detail on the colonisation of India, how witnessing social injustice affected her, being a mixed race woman in Britian, her many awe-inspiring achievements and why records tried to suppress any trace of her. As a British Indian woman, reading about her life resonated with me, and she should never be allowed to slip into obscurity. In many Asian cultures it is still frowned upon for a woman to fully speak her mind. She is the kind of cultural icon we need, and thanks to Anita, we finally have her. If a Punjabi princess followed her heart and questioned society 100 years ago, then we certainly can today.

To me, she truly is punk as fuck and the most original riot grrrl… SOPHIA DULEEP SINGH (8th August 1876 – 22nd August 1948).


The book: Sophia: Princess, Suffragette, Revolutionary – Anita Anand

Short podcasts on her life: Part 1 and Part 2

BBC short documentary: Sophia: Princess, Suffragette, Revolutionary presented by Anita Anand
 

Standard

It’s a polenta cake, omg…

 So I’ve had this packet of polenta in my cupboard for a while now and finally made something with it. I present to you my vegan and gluten free orange upside down polenta cake with pistachio, rose and cardamom. I know that title is a bit of a mouthful, but hopefully it makes you want a mouthful… 

I’m forever buying different types of flour to bake cakes and breads with (in search of the best gluten free replacements for the coeliacs in my family). There is a lack of progress pictures in this recipe because I wasn’t quite sure how it would turn out. But it was beautiful and I had to tell you about it. The polenta held together very well with flaxseed as an egg substitute; great result as sometimes gluten free cakes can crumble into dust. I put orange juice in the mixture too so it wasn’t dry. It is very delicately spiced with cardamom and the rose water is only in the icing on top, so don’t be put off thinking it might be overpowering. You could choose to leave them out, but trust me, they add a gentle, warming flavour and aren’t too “perfumy”. There’s not much more to say really, other than look at my gooey, fruity, nutty, cake! Bit of alright, isn’t it? If you like the look of that, then find the recipe below, bake it and tell me about it 🙂 

  You will need:

  • one 20cm cake tin
  • baking parchment
  • a few bowls
  • and obviously an oven

(In the pictures mine is double layered with icing in between as well as on top, because I thought I had too much cake mixture so separated into two tins. But in fact it would have worked best as one, so I’ll write this recipe as one. I make mistakes too, on occasion.)

INGREDIENTS

  • 100g polenta (cornmeal)
  • 50g ground almonds
  • 50g plain white flour (Doves, Glutafin, or regular if not making gluten free)
  • 150g caster sugar
  • 2 tsp baking powder
  • 1 tsp ground cardamom
  • 3 flax eggs (3 tbsp ground flaxseed mixed with 9 tbsp water)
  • 3 oranges (the juice of 2 and slice the other thinly, carefully remove seeds and peel around the outside once sliced)
  • 200ml non-dairy milk, I used almond

To decorate:

  • 1 tbsp chopped pistachios (quick blitz in food processor)
  • 1 tsp rosewater
  • Icing – make a small amount of the runny, glace icing according to packet instructions. I coloured mine pink with a splash of cranberry juice – be careful buying food colourings as many are not vegan!

METHOD

  • Preheat your oven to 190C. All cake recipes start like this don’t they? These are the cake rules. Oven on now, please and thanks.
  • In a small bowl, mix the flax and water well and leave to one side for 10mins or so until it reaches a gooey consistency, much like an actual egg.
  • In a large bowl, combine the polenta, flour, sugar, baking powder and cardamom.
  • Add the milk, orange juice, flax eggs to the dry ingredients and stir together until everything is combined well.
  • Prepare the cake tin by lining the bottom with a cut-to-size circle of baking parchment. Grease the sides with a small amount of vegan margarine or oil. Arrange the slices of de-seeded and peeled oranges on the parchment, cover as much of the base as you can (cos it will look really nice on the top once baked!)
  • Pour the cake mixture evenly into the tin and bake in the oven for 30-35 mins until a toothpick comes out clean.
  • Allow to cool for a few mins before flipping out of the tin. Peel back the parchment to reveal your oranges and let it cool completely before decorating.
  • Prepare the glace icing (mix in the rosewater and cranberry juice for colour if you want to include this). Drizzle over the top of the cake and scatter over the chopped pistachios. Now you can slice and eat it.

 The texture of polenta is coarser than wheat flour, so you will get a firmer cake, not a light and fluffy sponge. Which is really pleasant in this recipe as it’s sweet, well flavoured with almonds and cardamom and moist from the orange juice. Not exactly a healthy recipe, but remember there’s no dairy in this and it contains nuts and fruit which count for something, right? Hope you like it!

S.x

Standard

It’s a vegetable spiral tart, omg…

 OMG. I haven’t written anything for ages. But I’m getting back on it now during the run up to Christmas and will be sharing some fancy and nice looking recipes, which I hope you can use and impress with. I’m pretty pleased that I’ve managed to talk my family into letting me do a fully vegan Christmas meal for five! So I need to come up with a few tricks. I had a go at this gluten free vegetable tart, which I think will look even better the more times I make it.

For this you will need:

  • A mandolin slicer (or a wide vegetable peeler, or excellent knife skills to slice thinly and neatly)
  • A loose bottomed baking tin
  • A food processor

You can use any vegetables you like, really. I had a butternut squash which needed using, but I will definitely be making it again with aubergines, courgettes, carrots. The more variety, the better it will taste and more colourful it will look.


INGREDIENTS

For the crust: 


  • 1 flax egg (1 tbsp ground flax + 3 tbsp water – mix and leave to one side for a few mins)
  • 225g rolled oats (you can use gluten free if ya wanna)
  • 25g pine OR walnuts
  • 2 tbsp olive oil
  • ½ tsp salt

For the filling:

  • 1 small red onion
  • 2 cloves garlic
  • 2 handfuls of fresh, baby spinach
  • 2 finely sliced mushrooms
  • ½ finely sliced bell pepper
  • ½ butternut squash (sliced very thinly, lengthways with mandolin)
  • A pinch of smoked paprika
  • 1 tbsp olive oil
  • Ground black pepper


METHOD

  • Put the nuts and oats in the food processor and pulse until it forms a coarse flour type of texture. Add the flax egg, salt and olive oil, process again for about 30 secs. The mixture should stick together when you pinch it between your fingers.  
  • Spread this out into your tin, pressing down with your hands to compact the crust mixture against the bottom and along the sides. Thoroughly washed and clean hands, yeah? Don’t be gross…
  • Pop this in your oven at 200C for ten minutes whilst you prepare the filling. Take it out and reduce oven temperature to 180C.
  • So for the filling. Food process the onion, garlic, spinach and 1 tbsp of oil then spread it along the base of the crust with the back of a spoon.
  • Now you can start assembling your thinly sliced veg. I started in the middle with the smallest pieces of butternut squash. Roll tightly and place in the middle. Then start working your way around it with bigger strips, overlapping in a spiral pattern.
  • Layer the larger slices along the outer edge and continue to overlap until all the strips meet in the middle.  
  • Place the pepper and mushroom between the squash, distribute evenly and again, use the smaller strips towards the middle and the bigger ones along the outside.
  • Sprinkle over with paprika and freshly ground black pepper. Lightly drizzle with a bit more olive oil.
  • Stick it in your 180C oven for 40 mins and it should come out looking beautiful. Let it cool for a few minutes before you pop it out of your tin.


Enjoy 🙂 You could experiment with different ingredients to spread on the base. A tablespoon of pesto or any savoury preserves or chutneys you might have will add to the flavour.

S.x

Standard

It’s baklava, omg…

 (makes approx 24 bite sized pieces)After fracturing my arm in July and being unable to cook anything exciting for many weeks, *SoniaSadFace*, I am now fully recovered and back with a vengeance! And very inspired after my short trip to Athens at the start of August where I tracked down a few vegan places, so I’m gonna tell you a bit about those before I get into my recipe. Which is a mash up of Indian gajar halva and Mediterranean baklava. I just dug up these really sweet homegrown baby carrots, you see, so thought I’d get creative… 
  

Avocado: Food For Life

Oh my gosh, THIS PLACE.  

I nearly lost my mind and when I saw the sheer variety of food. Vegetarian, vegan, gluten free heaven. After a long time of staring at the menu and realising I couldn’t order everything, I picked a starter and main:

  • Mother Earth – Spinach tart with leeks, sun-dried tomatoes, dill and garlic topped with walnuts and almond shavings on an organic oat, amaranth and flaxseed crust. (6 Euros)  
  • Swaha – organic red and white quinoa served with a mushroom ragout and housemade organic soy/mushroom sausage. (11.50 Euros)  

Everything looked so beautiful when it was placed in front of me I nearly wept into both plates. Local vegan beer too, happy days! I even went back before my flight so I could pick up a packed lunch for the plane home. Super delicious and healthy, it’s definitely the best vegan food I’ve ever had. The staff was really friendly and the décor was beaut. I would go to Athens again just to go back here.


Bamboo Vegan

This super cute little shop was a bit of a trek from where I was staying, but it was definitely worth the up hill walk in the sweltering heat, where it appeared like some mirage…

I was greeted by the lovely owner, Fotis, who was very knowledgeable about local places for great food, live music and of course the huge range of products in his shop. He was so nice and appreciated my time taken to find the store so much that he gave me some free, traditional Greek pastries. Vegan spanakopita (spinach pie) and galaktoboureko (custard pie – he’d used semolina flour in his vegan version). An absolute treat. 

 I brought back a few foodie items and will certainly have a go at making my own Greek vegan feast at some point 🙂
So now onto my recipe! I saw amazingly good looking baklava in Athens and couldn’t have any, so this had to happen:

INGREDIENTS

  • 300g grated carrots
  • 200g mixed nuts (I used walnuts and pistachios)
  • 300g caster sugar
  • 200ml water
  • 2 tsp ground cinnamon
  • 1 tsp ground cloves
  • 2 tbsp melted vegan margarine
  • 6 sheets filo pastry (Jus Rol is vegan, yay)
  • 1 tsp vanilla extract

METHOD

  • Melt a small amount of margarine in a pan, add the grated carrots, 100g of the sugar, the cinnamon, vanilla and cloves. Mix well and heat for about 5 mins on a medium heat until the sugar melts and the mix is nice and gooey. Leave to one side to cool to room temperature.
  • The nuts need to be chopped finely – be lazy and put them in a food processor. Mix these in a big bowl with the cooled carrot mixture.
  • Heat oven to 180C.
  • In a pan, heat the 200ml water and the remaining 200g sugar for 10 mins on medium to make a syrup. Leave to one side as you assemble your baklava.
  • Place one sheet of pastry in a large baking tin. Brush with some of the melted margarine, place another pastry sheet on top and brush again. Then spoon on half of the carrot/nut mixture. Repeat again –  pastry, margarine, pastry, margarine, carrot/nut mix, pastry, margarine, pastry.
  • Top the final sheet of pastry with the syrup. Just pour it all over evenly – do not worry if it looks too watery as it will reduce as it cooks in the oven.
  • Cut across and to the bottom of the baklava in diagonals to form diamond shaped pieces. Place in the preheated oven for around 40 mins until it is golden brown and crispy.

 Then take it out and eat it! Gajar halva is made with spices and nuts, bakalava is made with spices and nuts, so I reckon the addition of carrots to this works well. It looks like a lot of effort but it’s not at all.

Hope you like it 🙂

S.x

Standard

It’s tofu, omg…

 (Serves 2) Tofu is a staple in vegan diets, I haven’t posted a recipe including it yet so I’m now rectifying this shameful travesty. It might look like a tasteless, weird, wobbly block of nothingness but once you get the hang of cooking with it you can make it crunchy and crispy in savoury dishes and even use silken tofu to make creamy puddings. Protein rich and also a good source of calcium, it is made from curdling soya milk to form curds which are pressed together. A very similar process to how cheese is made. And because I said I wanted to tell you more about Punjabi recipes, I had a go at making a paneer style karahi dish. Traditionally cooked in an iron, flat bottomed wok (a karahi), quite a dry curry made with ground chilli powder and fresh peppers.

Tofu takes on the flavours of your marinade – without any seasoning it really does taste like wobbly nothingness. I used nutritional yeast, lemon juice and salt, let it sit in that for a couple of days in the fridge to create a paneery flavour. The salt helped to draw out extra liquid to give it a firmer, more paneer-like texture and the lemon gave it a slight tang. 

Now if you haven’t come across nutritional yeast before, I know those words together hardly conjure up mouth watering images of decadent food… but it’s seriously good! It is a deactivated yeast (so it doesn’t have leavening abilities – it won’t make your food expand during cooking!). It has this cheesy, nutty flavour which hits that umami spot. You can find it in good health food shops for a couple of quid or online for a bit more. Basically, go buy some now so you can have cheesy flavours back in your vegan life. Put it in your pasta dishes, spoon it directly from the tub into your mouth… OR make my lovely Indian curry dish below…

INGREDIENTS

  • 250g firm tofu
  • 2 tbsp nutritional yeast
  • 2 tbsp lemon juice
  • 2 tsp salt   
  • 1 large onion, sliced
  • 4 cloves garlic, minced
  • 1 fresh chilli, finely chopped
  • 1 bell pepper, sliced
  • 1 inch piece fresh ginger, finely chopped
  • 2 tsp ground red chilli powder
  • 2 tsp dried fenugreek/methi
  • 2 tsp cumin seeds
  • 2 tsp ground coriander
  • 2 tbsp oil (I use raw virgin coconut, olive oil is fine)
  • 400g chopped tomatoes   

METHOD

  • Do your magic tofu into paneer prep two days before! Mix the nutritional yeast, lemon juice and salt and put into a small clear bag/sandwich bag/zip lock bag. Drain your tofu, pat dry with paper towels and dice into bite sized pieces. Put them in the bag and mix well but gently to ensure even coverage. Try to press out as much air as possible and seal the bag. Leave it in the fridge for up to three days.
  • So a couple of days later… make your curry base. Heat your oil in the wok. Cook the onion and garlic for 5 mins until browned, on a medium heat.
  • Add the ginger and spices, continue to cook and stir for 2 more mins until fragrant.
  • Add the chopped tomatoes and fresh chilli, stir well. Add the sliced pepper, stir to coat and cook for a further 2 mins.
  • Remove your pieces of tofu from the bag and transfer into the pan. Stir gently, again to coat everything. Allow to cook for 10 to 15 minutes until the curry sauce is quite dry and thick and the peppers are tender. The tofu will hold its shape and cook in the sauce.  
  • EAT IT! I ate mine with some brown rice. Lovely stuff.

This tasted great. The initial tofu marinade did give it the mild cheesy taste and texture I was hoping for, and then it was cooked again in the curry spices which added even more flavour. Tofu is a flavour sponge and making fake paneer is my new favourite thing to do with it. Might become yours too?

S.x

Standard

It’s tempeh, omg…

(Makes enough for four wraps)  TEMPEH! As well as being a satisfying word to say in a Yorkshire accent, tempeh is another wonderful soybean product – no cholesterol, low calorie – and is far less processed than tofu. Originating in Indonesia, tempeh is made from fermented whole soybeans which retain a high fibre, vitamin and protein content. Its texture is quite firm and it has a mild yet deeper, earthier flavour compared to tofu, so is ideal for dicing up without falling apart and marinating to take on your chosen flavours. You should be able to buy tempeh in health food shops, though I found this decent sized block in the frozen section at my beloved local Chinese supermarket for £1.69, and simply had to give it some of my spice rack treatment. Seeing as I’m from a Punjabi family and I haven’t yet posted an Indian recipe (sorry mum, gran, my people), I decided to do my take on a tandoori/tikka style wrap with a homemade spice blend AND homemade chapattis so you’re getting more than one recipe in this post, dear reader, lucky you… Alas, I do not have a traditional tandoor oven (one day I will), so to make this you need a non-stick griddle pan for the tempeh and a flat and wide skillet or shallow frying pan for the chapattis. A rolling pin, too.

INGREDIENTS

  • 200g tempeh
  • Cooking oil (I use raw virgin coconut oil, but olive oil is also fine)

Tandoori spice mix:

  • 1 heaped tsp ground red chilli powder
  • 1 heaped tsp smoked paprika
  • ½ tsp ground cinnamon
  • 1 tsp garlic powder
  • ¼ tsp ground cloves
  • ½ tsp ground cumin
  • ¼ tsp ground black pepper  

(You can use a pre-made tandoori spice mix from your local Asian shop but I don’t like to cheat 😉 I won’t judge you or tell anyone if you do…)

  • 3 tbsp vegan yoghurt (I used CoYo coconut)
  • Handful of fresh, chopped coriander
  • Half a large onion, sliced

Chapattis:

  • 4 heaped tablespoons wholewheat flour
  • 2 tbsp fresh, chopped coriander
  • 2 tsp cumin seeds
  • Warm water as needed for dough
  • Lettuce, salad, lemon juice, hot sauce, mint sauce – your choice, for serving


METHOD

  • Prepare your tempeh – defrost if it’s frozen. Dice into 12 pieces and steam for ten minutes. If you don’t have a steamer, you can boil in water instead. Drain and set aside to cool.
  • Mix all the dry spice ingredients in a small bowl, lightly toast them for a couple of minutes in a frying pan until they are fragrant. Take care not to burn! Transfer back into the bowl and wait until cool. Add the yoghurt and stir well.     
  • Spoon this marinade onto the tempeh in an airtight container. Ensure all the pieces are coated well. Cover, refrigerate and leave to marinate for at least 3 hours.

In this time you can make your chapattis! It won’t take you three hours though, do not fret:

  • Mix the flour, coriander and cumin in a large bowl. Add water a little at a time whilst mixing with your hands to form a soft and springy dough. If it becomes too sticky, add a bit more flour, if it becomes too dry, add a bit more water, until the consistency is right – everything should hold together and not stick to the side of the bowl or your hands. Knead well for a few minutes. Leave to rest in the fridge for half an hour.
  • Divide into four balls of dough. On a clean and lightly floured surface, roll out the dough into thin circles. Cook each chapatti one at a time on a medium heat on your skillet/shallow frying pan for approx 3 mins each side. Once off the heat, coat one side very lightly with a small amount of vegan butter or oil to stop them from drying out. Keep aside until needed to assemble your wrap!  

Time to whip out your griddle pan for tempeh time:

  • Heat a small amount of oil to just coat the surface of your pan. Place your pieces of marinated tempeh in the pan and cook on each side for 3 to 4 minutes. You’ll smell the amazing spices and each side will turn a darker brown/red as it crisps up. YUM. Once it’s all cooked, use the same pan to fry off your sliced onions for a further 5 mins.  
  • WRAP TIME. Reheat your chapattis in the microwave/under the grill/oven. There should be enough tandoori tempeh to make four wraps – four chapattis, four pieces in each one. Add in your salad, squeeze of lemon, onions and sauces. EAT and SMILE.

These turned out very well indeed. Crisp and spiced on the outside and tender on the inside. I can’t think how I’d improve it, really! The process might seem quite long, but it’s worth it. The tempeh really does need a few hours to marinate – you could prepare the night before. To save some time you could serve in pre-made tortilla style wraps. They would also go nicely in a salad or with rice and a curry sauce.

I’m feeling very inspired now about cooking and writing about some more traditional Punjabi recipes so expect a few more posts like this 🙂

S.x

Standard

It’s beetroot, omg…

(serves 2) 


I wish more food was pink and purple! Unusual food colours are exciting. I love how beetroot stains your plate after you’ve finished, visually proclaiming “I am beetroot, I was here”. How the juice stains your fingers and clings to your knife when you cut into one. How enticing it looks when you place your peeler on a fresh one, remove the first of the dull outer layer and expose that first burst of rich vibrancy on the inside… YES BEETROOT.  

I don’t live very far from Keelham Farm Shop and at the weekend I saw they had some great quality ones in with their stems and leaves still attached. Bigger than the ones seen in supermarkets, firm and smooth with really fresh looking leaves. Perfect. Beetroot fact of the day: the leafy bits contain more nutrients than the beetroot itself.

There might be a misconception that the greens are inedible because you don’t see them attached to beetroot available in the bigger shops, but they are a great source of calcium, iron, vitamins A and C. The calcium bit is particularly handy for vegans to know; another leafy green variety to try out. Dairy isn’t the only calcium source.

The root itself provides fibre and potassium. Even more so if consumed raw (put some fresh beetroot in your smoothies or hummus!). The leaves can taste quite bitter uncooked, so masking the flavour, again, in a smoothie is an ideal way to get the full nutritional benefit.

I fancied getting a bit more creative, though, so here’s how I made this spiced, coconutty beetroot with wilted beetroot greens…

INGREDIENTS

  • 2 fresh beetroot with leaves/stems attached
  • Creamed coconut mixed in 200ml hot water OR 200ml coconut milk
  • 1 medium red onion, sliced
  • 1 clove garlic, minced
  • 2 inch piece fresh ginger, finely grated
  • 1 chilli, finely chopped
  • 1 tsp mustard seeds
  • 1 tsp ground cumin
  • 1 tsp ground cardamom
  • 1 tsp salt
  • 2 bay leaves
  • Glug of olive oil
  • Drizzle of tahini and sriracha (optional)  

METHOD

  • Cut off the beetroot greens, wash very thoroughly. Set aside. Peel the beetroot and dice into approx 1cm cubes.
  • Heat a small amount of oil in a large non-stick pan, add the onion, garlic and bay leaves. Cook on a medium heat for 10 mins until browned.
  • Add the ginger and cook for a further 2 mins, stirring to prevent sticking. Add in all the rest of the spices, fresh chilli and salt, cook for another 2 minutes, stirring to coat all the ingredients.  
  • Add the diced beetroot, again stirring very well to coat everything in the spice mix. Cook for 2 mins on the medium heat to soften.
  • Add the creamed coconut OR coconut milk. Stir, cover and reduce heat to low. Allow to cook for 10 minutes, until the liquid has reduced and the beetroot is tender. Remove and discard the bay leaves.

Beetroot greens…

  • Chop the stems and leaves into bite-size pieces. Cook the stems first, in a pan (lid on) with a small amount of olive oil for 3 minutes on a medium heat. Add the leaves which take less time to become tender, and cook for another 3 minutes.  

I served my cooked greens with a light drizzle of tahini paste, topped with the spiced beetroot and some sriracha sauce (I mentioned in another post I’m a bit addicted), but it’s entirely up to you and your spice preference! The cooking of the beetroot brought out the natural earthy sweetness, which balanced really well with the spicy coating. The beetroot greens had a milder earthy flavour, similar to spinach and chard. My non-vegan mum had some of this for lunch and loved it, and she’s usually my toughest critic. So it was well worth it! Full of flavour, textures, nutrients and almost no fat. Get to your local farm shop and buy some lovely beetroot with their tops on!

S.x

Ps – BEETROOT CRISPS! Slice a fresh one very thinly (use a mandolin slicer if possible). Place on a baking tray, making sure the slices don’t overlap. Brush very lightly with oil and bake on 190 degrees C for half an hour. Result = crunchy tasty times.

Standard

It’s a Breville Blend Active, omg…

At midday on the 23rd April 2015 my life changed forever when my Breville Blend Active was delivered to my front door.

Now, I am fairly well known for exaggerating for dramatic effect and you might roll your eyes upon reading the above statement about a blender, but it’s true, I tell you! This is just a quick post to tell you of the wonderful things I’ve created with it in the past two weeks. Perhaps it will interest and inspire at least one person. You never know… 


 Twenty two British pounds. It’s compact, powerful and easy to clean. I’ve used it every single day. Sometimes even multiple times in a day. It comes with an extra flask too so you can make tasty stuff for your friend/enemy/wife/husband/lover and send them on their way. So good.

So firstly, let’s talk about the brilliance of smoothies. I bought packets of organic cacao powder and wheatgrass powder (sale on at Holland & Barrett, ta very much). Cacao is high in iron, potassium and magnesium and adds a subtle chocolate flavour. So a heaped teaspoon of that in your drink is both healthy and delicious. Wheatgrass is full of loads of different nutrients counting towards your five a day, particularly high in vitamin A. It’s naturally sweet, so again a teaspoon of this in your smoothie adds so many extra health and taste benefits. Ideal supplements for vegan diets! I’ve been trying out A LOT of different smoothie combos for breakfast. Baby spinach, coconut water, wheatgrass, flaxseed, pear and avocado is my current favourite. A good tip is to buy tinned fruits (in water/own juices, not syrup) and to keep fresh ones in the freezer. This obviously means they keep for longer and the frozen stuff makes your drink nice and cold. Yum. So excellent for packing in loads more fruits and vegetables into your diet in a very easy and delicious way.

(Strawberry, almond milk, chia seeds, cacao powder, banana)  
There is a lot of stuff online to read about smoothie concoctions so I’ll tell you about the more creative things I’ve made…

Cashew cream: I soaked a small packet of cashew nuts in cold water for three hours, drained and transferred to the blender, and added water as needed to loosen the mixture. It’s pretty amazing. You end up with a rich cream. You can add salt/pepper/garlic powder and use it as a savoury dip (for example, a vegan replacement for sour cream with burritos), OR sweeten with a bit of vanilla essence and have with dessert. 


Cauliflower couscous: Cut a cauliflower into florets and blend in batches. It becomes fine and grain-like. A carbohydrate free version of couscous. Can be eaten raw, or cook it for a few minutes with a glug of olive oil in a frying pan. 

 Hummus: I used one 400g tin of drained chickpeas to make two different types. In one batch, I blended 3 tbsp tahini paste, half the can of chickpeas, 1 tbsp fresh chopped coriander, a little water to aid the blending. Top with extra coriander, smoked paprika and sesame seeds.

I did the same thing again for the second batch but with parsley and one whole roasted beetroot. So tasty, very simple to make and no preservatives. 

 I told you it changed my life! 😉

Here is the link on Amazon. Get one!

S.x

Standard

It’s soya mince, omg…

(serves 2)


Low in fat, cholesterol-free and cheap! All good things to hear, and soya mince is all three. Though there is some debate on the negatives of a diet high in soybean products, a small amount a couple of times a week is great way to introduce another protein variation to a plant-based diet. So when I found a 450g bag in Tesco for £1.75 I had to give it a try. I made a chilli with mixed beans and carrots which turned out really well, but there are so many chilli recipes out there. I was feeling creative a couple of days ago and made some spiced soya mince and sweet potato balls which were delicious so I’ll tell you about those instead…

  
INGREDIENTS

  • 1 large sweet potato
  • 150g soya mince (defrosted to room temperature)
  • Juice of ½ a lemon
  • 1 tsp cumin powder
  • 1 tsp smoked paprika
  • 2 tbsp chopped fresh parsley
  • 1 tsp flaxseed
  • Salt and pepper to taste


METHOD

  • Peel the sweet potato, chop into medium chunks and boil for ten mins until soft.
  • Mix all of the other ingredients in a bowl. Drain and add the sweet potato, mash the mixture together with a fork.
  • Get stuck in with yer hands! Form some balls. This amount of ingredients made nine golf ball sized ones. You could make them big or small, depending on how you like your balls.
  • Set your oven to 200 degrees C, lightly oil a baking tray to prevent sticking. Pop your balls on and bake for half an hour.


Super easy and super tasty. It was my first time trying frozen meat free mince and I was apprehensive at first. But I found that the texture was good and it took on all the flavours of the other ingredients. Really ideal to make in bulk and freeze. I served mine with cauliflower couscous, veggies, salad and sriracha sauce (which I’m currently obsessed with). I snuck in flaxseed for extra goodness and when I make these again I’ll add in some ground up seeds for additional crunchiness. I promised a few of you on the What Fat Vegans Eat group I’d tell you my recipe for these, so there you go. Enjoy my balls.

S.x

Standard

It’s stuffed courgettes, omg…

(serves two – one courgette each)  


You might ask, hmmmm, how does one stuff a courgette? Well, read this and I’ll tell you. This is a quick blog post for a quick dish I made tonight with just a few store cupboard ingredients, so there’s a lack of process pictures; I only realised after eating that it was worth writing about! It is cheap and easy (pardon the innuendo), but looks quite impressive! Plus I threw in a load of healthy things and it tasted really fresh and flavoursome for my dinner tonight…

INGREDIENTS

  • 2 courgettes, cut in half lengthways, scoop out the flesh with a spoon, chop and keep aside
  • 1 medium onion, finely diced
  • 2 cloves garlic, minced
  • 1 carrot, grated
  • Small handful of walnuts, chopped
  • 1 tablespoon sunflower seeds
  • 1 tablespoon ground flaxseed
  • 50g pearl barley
  • A few sprigs of fresh thyme (dried is also fine)
  • Salt and pepper, to taste
  • 1 tablespoon olive oil
  • 2 tablespoons fresh parsley, chopped


METHOD

  • Fry the onion and garlic in the oil on a medium heat for 7 to 10 minutes until golden brown.
  • Add the chopped carrot, courgette flesh, thyme, salt and pepper, mix well to coat everything. Continue cooking for a further 10 minutes.


  • Meanwhile cook the pearl barley according to packet instructions.
  • Add the seeds, nuts and fresh parsley to the onion/carrot mix, stir well and turn off the heat. Then add the cooked pearl barley, again stir in to mix everything together.
  • Brush a little olive oil onto the outside of the halved courgettes and place on a baking tray. Grill on a medium setting for 10 minutes.
  • Remove from the grill/oven and spoon the mixture into each hollowed out courgette. Return to the grill/oven on a lower setting for a further 10 minutes. Keep an eye on them so they don’t burn! Serve immediately.

I put this together with things I had lying around, so you don’t need to follow the recipe exactly if you don’t have a certain ingredient in your cupboard. I put the seeds and nuts in for a bit of crunch and protein to make this more balanced and substantial. Awesome fact alert: Sunflower seeds have almost the equal amount of protein as the same sized portion of chicken would provide. Once again proving you can cut out the meat and still get the nutrients you need 😉 

I will definitely make this again with tomatoes and fresh basil, and rice instead of pearl barley. I do hope you have a go at this one, it was improvisation which turned out really well. Plus I made extra filling which I can have mixed with salad for lunch tomorrow. Nice one. 

 S.x

Standard